
I’m not a doctor or a professional baker. I’m just someone with ADHD who found real peace in slow, grounding routines—especially homesteading and baking bread. There’s something about using your hands, watching something grow (starter veggies or chickens!), and creating from scratch that calms the chaos in my head.
Baking bread, for me, is a form of self-care. It doesn’t require perfection. It’s forgiving. It keeps me connected to my home and body and it feeds my family!!! If you’re also neurospicy and looking for a manageable rhythm in your day, sourdough baking might be a perfect place to start.

What Is Sourdough & Why Is It Awesome?

Sourdough is a natural way of making bread using wild yeast and bacteria from the environment. Instead of commercial yeast, sourdough uses a fermented starter made from flour and water that becomes its own little ecosystem of beneficial microbes.
Health Benefits of Sourdough:
- Easier to digest: Fermentation breaks down gluten and phytic acid
- Good for gut health: Full of natural probiotics (when not baked at super high temps)
- More nutrient-dense: Makes nutrients like iron, zinc, and magnesium more bioavailable
- Stable blood sugar: The slower rise and ferment can lead to lower glycemic response
- Fewer ingredients: You control what goes in
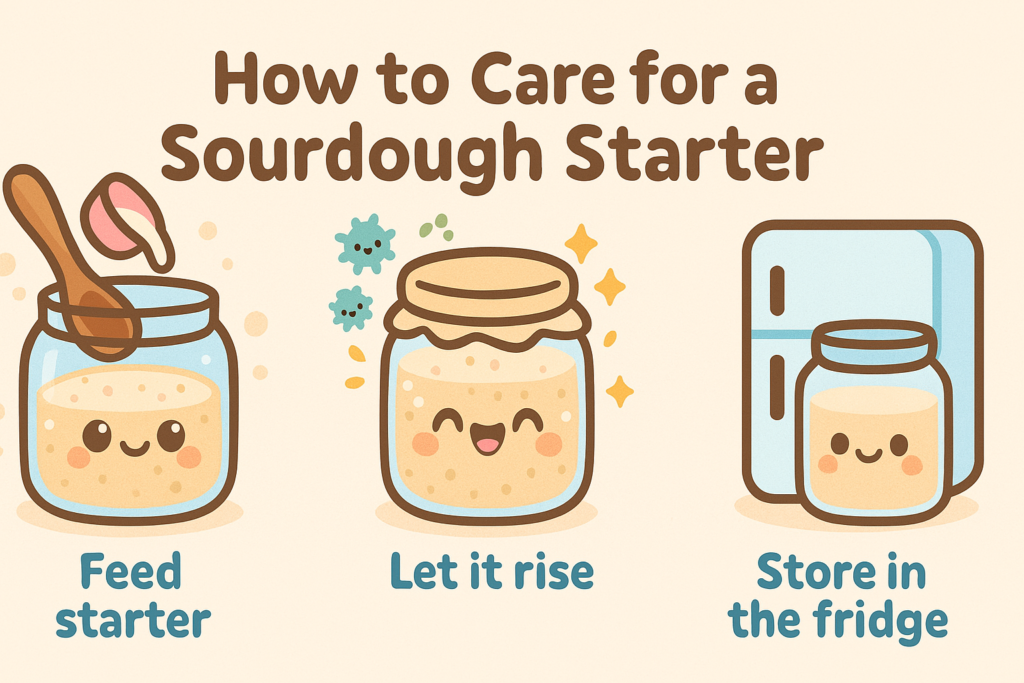
Sourdough Care Instructions – ADHD-Friendly Style
If you don’t have a friend who can share some starter with you, you can grab some from my shop. I try to always dry some extra, just in case!
Step 1: Rehydrate and Activate Your Starter
When you first get your dehydrated starter:
- Mix the flakes with 1/4 cup filtered water
- Stir until mostly dissolved, then add 1/4 cup flour
- Let it rest in a jar, loosely covered at room temp

Step 2: Feeding your Starter
Feed it every 12-24 hours with the same 1:1:1 ratio:
- Equal parts (by volume or weight): starter, flour, water (filtered)
Example: 1/4 cup starter + 1/4 cup flour + 1/4 cup water
It may take up to two weeks of daily feedings to get your starter active.
You’re looking for:
- Bubbles on the surface
- A rise in volume (it doubles when ready!)
- Tangy smell
If it’s slow to wake up, don’t worry—just keep feeding it once per day as described above. When it reliably doubles in size and is bubbly, you’re ready to move to maintenance mode.
In the mean time you will end up with discard. This is the part that’s left over after you take your 1/4 cup of starter and feed it. That unfed starter/discard can be used in recipes too. I collect mine in the fridge until I have enough to make some yummy crackers or even pizza!
Step 3: Maintenance Routine (The Chill Method for the Occasional Baker)
Once your starter is active:

- Store it in the fridge with the lid on
- Feed it once a week, even if you’re not baking
TIP: Collect Your Discard
If you don’t want to waste all that flour do this:
- Keep a separate jar in the fridge labeled “discard”
- You can use it for pancakes, crackers, muffins, or compost it
- or don’t discard and just build up to a large starter then make a big batch and freeze!
Activate your Starter (after chilling in the fridge)
When you want to bake, feed it and leave on counter for 1-2 days to activate it. Keep feeding it until it doubles in size.
here is a visual schedule of what to expect if you want fresh bread on Saturday:
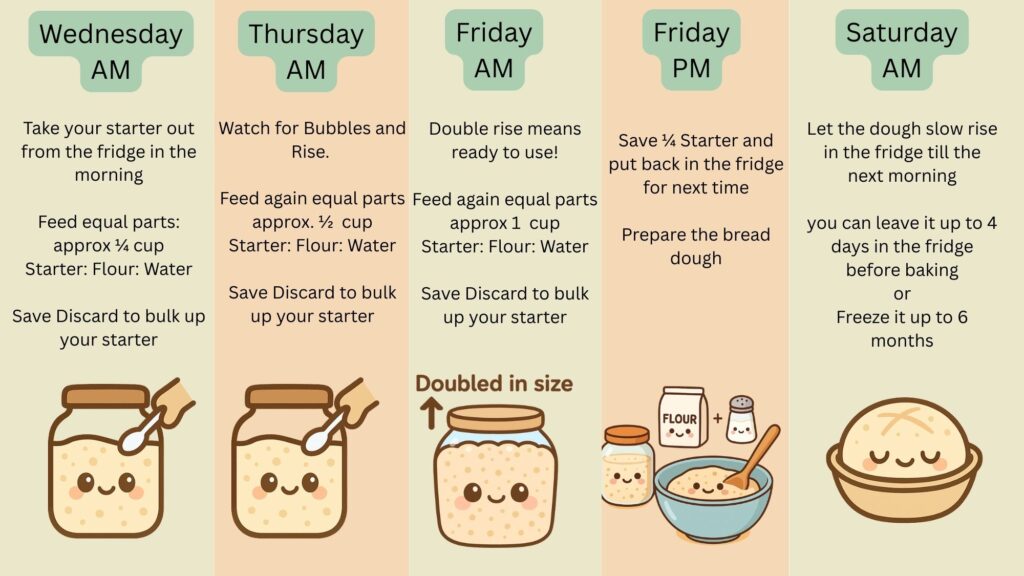
My ADHD-Friendly Baking Routine for Stocking the Fridge or Freezer
If you follow this routine you will end up with 4 small loves either in the freezer or fridge, ready to pull out when you need them.
Breakdown of the Steps
- Activate your starter (by feeding it daily as described above)
- Mix up the bread dough (follow my recipe, double it but use separate bowls)
- Refrigerate the dough (up to 1 week) or freeze (up to 6 months) (check out chilling instructions)
- Pull out and bake (Check Thawing Instructions)
This allows me to prep once and bake 4 loaves when I need them.
💡 About Overproofing:
If you leave dough out too long (especially on the counter in warmer temperatures), it can overproof, causing large air pockets. But honestly? Not a big deal. Still delicious. Don’t stress. 🫶

ADHDough’s No-Fail, No-Stress Bread Recipe 🍞
Ingredients:
this will make 2 small loaves or 1 large (watch for different baking times depending on size)
- 1 cup active sourdough starter
- 1 3/4 cups water (or more)
- 5 cups flour (all-purpose or bread flour)
- 1 tbs salt
TIP: To stock up my freezer I make this recipe double. I tried making it in one bowl, but believe me when I say it didn’t end up well 🙂 Unless you have huge mixing bolws I suggest just make them in two bowls its so much easier to handle.
Instructions:
DAY 1
- Mix the starter (1cup) and the water (1 3/4cup)
- Add the flour (5cup). Mix it with a wooden spoon or your hands. It should be moist, not a dry mess. Add more water if needed, then let it rest to rehydrate the flour for 5-10 mins. Cover it.
- Sprinkle the salt (1tbs) and add a few drops of water to help dissolve it. Mix it in well. Here, I make sure all my flour clumps are gone and the dough is starting to smooth out a bit. Leave it alone for about 1 hour. Covered.
- Next, you will begin a series of stretches and folds. I have no feeling for time so I do it as I remember and go about my day (I already have too many alarms in use). It’s suggested to do every 30-60 minutes for at least 3 times (~2h). The dough will get more stretchy and smooth with each round. I have done it in shorter timespans and I have spread it over the entire day and it came out fine in the end!
DAY 2
- At this point you’re done for today and can cover it and leave it on the counter or throw it in the fridge (especially in the Summer). If you want to freeze them, portion them into the size you desire. I like to make two small loaves from 1 recipe and pop them in the fridge or freezer. Make sure you cover them so they don’t dry out. You can throw them in freezer bags or fancy airtight containers of any shape.
- When you are ready to bake take out your dough and let it rest. The longer it rests the more it relaxes and expands30 min-1h. It makes it easier to shape the dough. Watch this video on how I shape my loaves.
- Preheat oven to 450
- Shaping: Add dough onto a floured surface and pull the ends into the middle, then roll it up and flip it upside down.
- Add some flour to the top of the dough and make a cut with a razor blade for a controlled expansion. There are many fancy ways how to do it.
- Place your dough onto parchment paper and transfer into a dutch oven


BAKING INSTRUCTIONS
For half loaves:
- Bake at 450°F — lid on 30 min, then lid off 10-15 min
- It should be 210°F in the center of the bread
- Cool and slice — or tear right into it 😋
For Full Loaves:
- Bake at 450°F — lid on 45 min, then lid off 10-15 min
- It should be 210°F in the center of the bread
Stay tuned for my favorite discard recipes, and more tips to make sourdough baking joyful, not stressful. What are you naming your starter? (Yes, it’s a thing!) I have not settled on one yet.
Hi, this is a comment.
To get started with moderating, editing, and deleting comments, please visit the Comments screen in the dashboard.
Commenter avatars come from Gravatar.